Figure-Eight Reversible Headband/Ear-warmer No Sew Picture Tutorial.
You will need: long loom, knitting hook, crochet hook, and yarn of your choice.
Pattern notes: You can make this headband/ear-warmer as long and wide as you like. I used 6 pegs on both sides. I used the figure-eight stitch. The directions for this can be found in the pattern book that came with the loom or you can use this link on the loom knitting help website. I also used two strands of yarn as one.
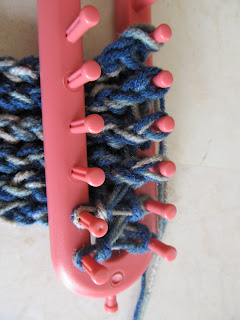
Take the stitches from one side of the loom and put them on the pegs directly across.
Once all the loops have been moved to the other side, take the bottom loop over the top loop. Only 1 loop will remain on the pegs.
You are now ready to bring the cast on row up through the loom. Put the stitches from the cast on row back on the loom. You will now have two loops on each peg.
Bring the bottom stitches over the top stitches. You will again have one loop on each peg.
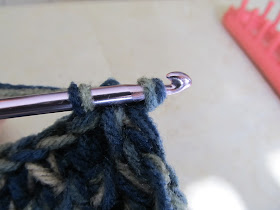
Starting on the side without the tail you will get your crochet hook and put the loops on the first peg on the hook. Put the yarn from the second peg also on your crochet hook. Pull the stitches through like a normal bind off for the long looms. Continue doing this until you reach the last peg.
When you reach your last two stitches you can cut your working yarn leaving a short tail. When you pull these stitches through make sure that you bring the tail through with the stitch. This will make a knot.
This is what the "seam" of the headband/ear-warmer will look like once you are finished. Go ahead and use your crochet hook to hide the yarn and maybe even make another small knot before cutting the yarn.
This is my first picture tutorial and I would love feedback. Please let me know if this helped you or if there is anyway I can make it better. :)


Thanks! Great job!
ReplyDeleteVery good for a first picture tutorial, very easy to follow and great pictures! I think I will make one....
ReplyDeleteIs the zig zag pattern in the first picture the same figure 8 stich? When I was following the firgure 8 it gave me a cable type stich on both sides like in your second picture.
ReplyDeletekoala girl, this headband was made using the figure 8 stitch. It will make a reversible headband. The pictures of the orange headband will show you what each side looks like. I am not exactly sure why your headband would have the same pattern on both sides unless it has to do with the way you are wrapping the last peg. I know that if I do not wrap the last peg the same way every time it will switch the way the stitch looks. It took me a while to figure this out, but that may be why. Could you post a picture on my facebook page so I can see yours. https://www.facebook.com/pages/This-Mama-Loom-Knits/284620761551932
ReplyDeleteLove the headband! Finally, I`ve figured out why I would get the same pattern on each side. If you don`t wrap the first peg, the sides have the same cable type pattern. If you wrap all the pegs (including the first one), then you get the two different pattern in the headband. Here`s a link http://www.youtube.com/watch?v=jwCuPkd5Vgk&feature=mfu_in_order&list=UL
ReplyDeleteThank you for posting this! I'm going to use this bind off for an infinity scarf.
ReplyDeleteI love this and will be making a few to match infinity scarves I made for a craft show. As soon as I am done I will post photos!
ReplyDeletethanks for the detailed directions! I made an infinity scarf using them :)
ReplyDeleteIt's beautiful!! I love your work!!
ReplyDeleteI am a new loomer. Thank you. You answered my questions from another designer’s pattern. Yours so much clearer
ReplyDelete